Understanding Air Leakage: How Hidden Gaps Waste Energy, Reduce Comfort, and Impact Building Performance
Published 8/26/2026
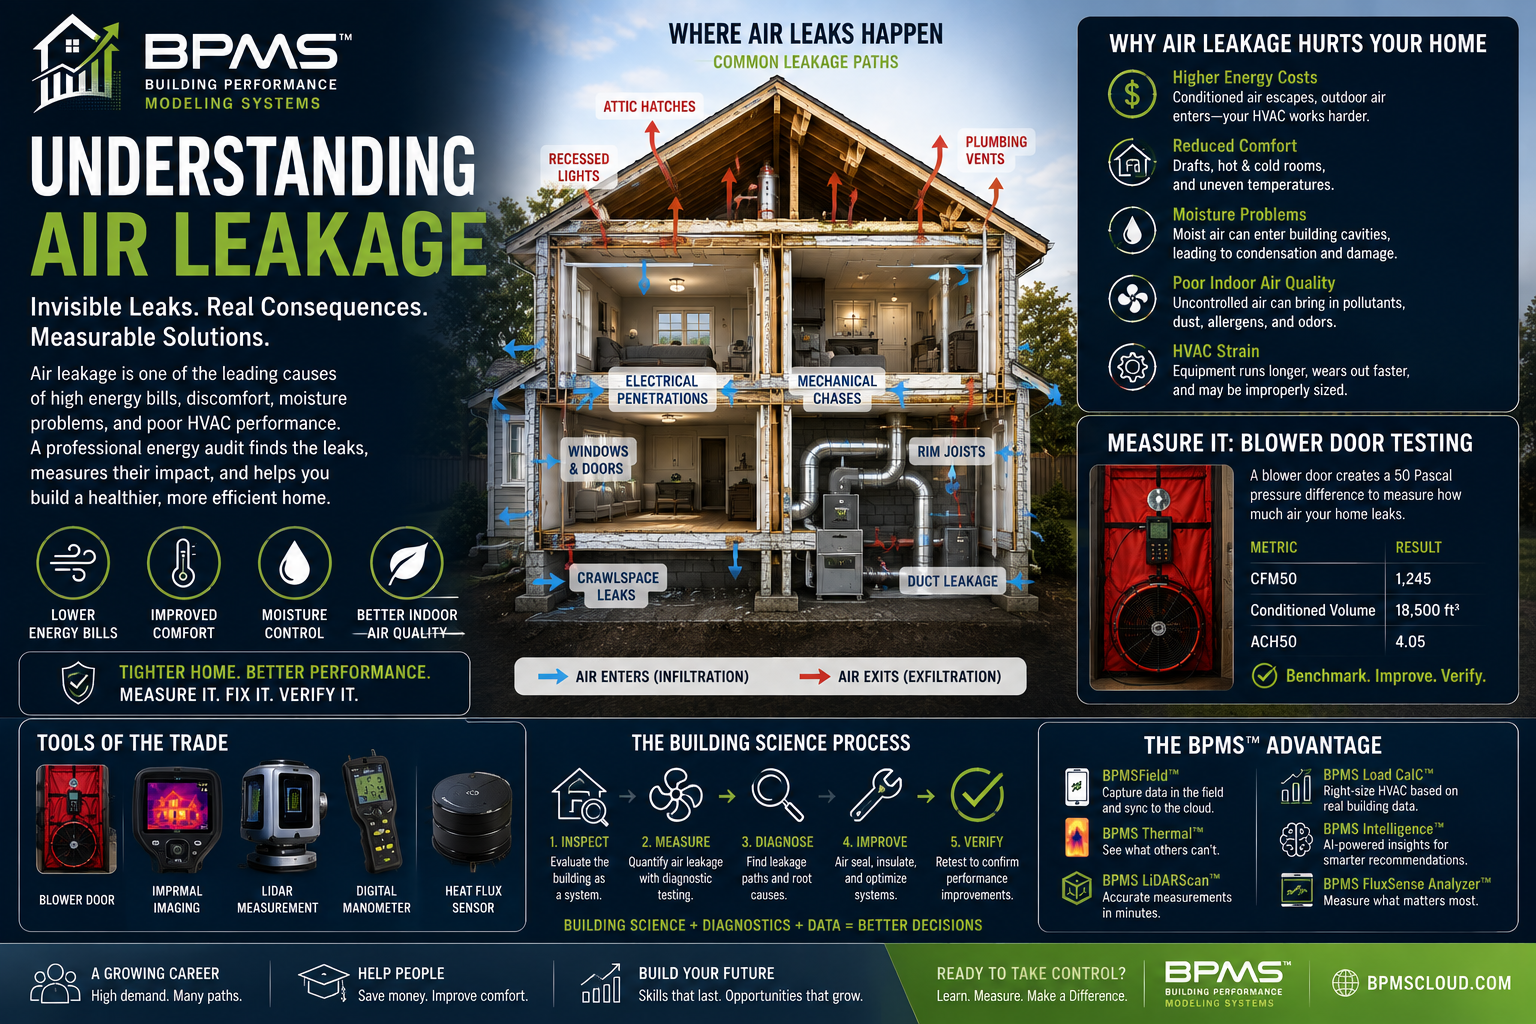
Air leakage is one of the most common—and most misunderstood—causes of high energy bills, uncomfortable rooms, moisture problems, and poor HVAC performance. This complete guide explains how air moves through a home, where leakage occurs, how energy auditors measure it with blower door testing and ACH50, how to diagnose leakage pathways, and how modern tools like BPMS™, BPMSField™, BPMS Thermal™, BPMS LiDARScan™, and BPMS Intelligence™ help professionals turn invisible air movement into actionable building-performance data.
Understanding Air Leakage: How Hidden Gaps Waste Energy, Reduce Comfort, and Impact Building Performance
A home can look completely sealed and still leak a surprising amount of air.
The windows may be closed.
The doors may be latched.
The attic hatch may look tight.
The walls may appear solid.
Yet air may still be moving through hundreds—or even thousands—of small cracks, joints, penetrations, cavities, and construction gaps.
That air movement can have a major effect on:
* Energy consumption
* Heating and cooling costs
* Comfort
* Indoor humidity
* HVAC performance
* Moisture movement
* Indoor air quality
* Building durability
For homeowners, air leakage often appears as a symptom.
A room feels drafty.
The upstairs is too hot.
The floors are cold.
The HVAC system runs constantly.
The utility bill is higher than expected.
For an energy auditor, those symptoms begin a much more important investigation:
Where is the air moving, what is driving it, and how is that air movement affecting the building?
Understanding air leakage is one of the foundations of building science.
And once professionals learn how to measure it, locate it, and explain it, they can uncover problems that are otherwise almost invisible.
⸻
What Is Air Leakage?
Air leakage is the uncontrolled movement of air through gaps and openings in the building enclosure.
It is different from intentional ventilation.
Ventilation is designed.
Air leakage is accidental.
Ventilation might come from:
* An exhaust fan
* An ERV
* An HRV
* A dedicated outdoor-air system
Air leakage may come from:
* Gaps around plumbing
* Electrical penetrations
* Attic bypasses
* Rim joists
* Window rough openings
* Exterior doors
* Duct penetrations
* Mechanical chases
* Framing connections
The distinction is important.
A high-performance building should not depend on random cracks for fresh air.
It should control unwanted leakage and provide appropriate ventilation intentionally.
⸻
Why Air Leakage Matters
Air leakage affects buildings in several ways simultaneously.
When conditioned air escapes, replacement air enters.
That replacement air may be:
* Hot
* Cold
* Humid
* Dry
* Polluted
The HVAC system then has to condition that incoming air.
That increases energy use.
But the impact does not stop there.
Air leakage can also move moisture into building cavities, create pressure imbalances, reduce insulation performance, contribute to comfort problems, and affect combustion safety in some buildings.
That makes air leakage much more than an energy issue.
It is a whole-building performance issue.
⸻
Air Leakage vs. Ventilation
This is one of the most important concepts for homeowners to understand.
A leaky home is not necessarily a well-ventilated home.
Uncontrolled leakage is unpredictable.
It changes with:
* Wind
* Outdoor temperature
* Indoor temperature
* Building height
* Mechanical equipment
* Door position
* Exhaust fans
Controlled ventilation is designed to provide outdoor air in a predictable manner.
The building-science goal is not:
Seal every opening and ignore ventilation.
The better goal is:
Control uncontrolled air leakage and provide appropriate intentional ventilation.
⸻
What Makes Air Move?
Air does not move randomly.
It moves because of pressure differences.
If there is a pressure difference and there is a pathway, air can move.
That gives us two things to investigate:
The pressure driver
and
The leakage pathway
Three major forces create pressure differences in residential buildings:
* Wind
* Stack effect
* Mechanical equipment
⸻
Wind-Driven Air Leakage
Wind applies pressure to the building.
The side facing the wind may experience positive pressure.
Other sides may experience lower or negative pressure.
If the building enclosure contains leakage pathways, air can enter on one side and leave on another.
The amount of wind-driven leakage depends on:
* Wind speed
* Wind direction
* Building shape
* Building height
* Nearby structures
* Terrain
* Distribution of leaks
A home surrounded by open terrain may behave differently from a similar home protected by neighboring buildings or trees.
⸻
Stack Effect
Stack effect occurs because indoor and outdoor air can have different densities.
In colder weather, warm indoor air tends to rise relative to colder outdoor air.
This can create:
* Lower pressure near the bottom of the building
* Higher pressure near the top
Air may enter through lower leakage pathways and exit through higher ones.
Common lower-level entry points include:
* Foundation penetrations
* Crawlspaces
* Rim joists
* Basement windows
* Utility penetrations
Common upper-level exit points include:
* Attic hatches
* Plumbing penetrations
* Recessed lighting
* Chimney chases
* Top plates
* Wiring penetrations
In simple terms, a leaky building can behave somewhat like a chimney.
The taller the building and the larger the temperature difference, the stronger stack-related pressures may become.
⸻
Mechanical Pressure
Mechanical equipment also moves air.
Examples include:
* Bathroom exhaust fans
* Kitchen exhaust hoods
* Clothes dryers
* Whole-house fans
* HVAC blowers
* Ventilation systems
If air is exhausted from the building, replacement air must come from somewhere.
If there is no intentional makeup-air path, it may come through uncontrolled leakage.
That can create both energy and indoor-air-quality problems.
⸻
The Building Envelope and the Air Barrier
The building envelope separates conditioned space from exterior or unconditioned spaces.
The air barrier is the layer—or connected collection of materials—intended to control airflow through that envelope.
Ideally, the air barrier should be:
* Continuous
* Durable
* Clearly defined
* Properly connected
In practice, discontinuities are common.
A building may have excellent insulation but still perform poorly because the air barrier contains many gaps.
This is one reason insulation and air sealing should not be treated as the same thing.
⸻
Insulation Does Not Automatically Stop Air Leakage
Homeowners often assume that insulation stops air.
Some insulation systems may contribute to air control when properly designed and installed, but insulation should not automatically be assumed to be the building’s complete air barrier.
For example, loose-fill attic insulation may reduce heat transfer while still allowing air to move through penetrations underneath it.
Common hidden leakage points beneath attic insulation include:
* Top plates
* Plumbing stacks
* Electrical wiring
* Open chases
* Recessed fixtures
If these areas are not sealed first, adding more insulation may simply hide the leaks.
⸻
Where Does Air Leakage Usually Occur?
Air leakage often occurs at transitions and penetrations rather than across large uninterrupted surfaces.
Common locations include:
Attic Hatches
Attic access panels may lack proper weatherstripping or insulation.
Plumbing Penetrations
Pipes often pass through floors, walls, and ceilings with oversized openings.
Electrical Penetrations
Wiring can pass through framing and ceiling planes, leaving leakage pathways.
Recessed Lighting
Older recessed fixtures may allow air movement into attic spaces.
Chimney and Flue Chases
Large openings around combustion venting can create major bypasses.
Rim Joists
The perimeter between foundation and framing can contain many gaps.
Windows and Doors
Leakage can occur around frames, weatherstripping, rough openings, and thresholds.
Mechanical Chases
Vertical or horizontal chases may connect conditioned areas to attics, crawlspaces, garages, or other spaces.
Duct Penetrations
Openings around ductwork can create leakage through the enclosure.
⸻
The Difference Between a Small Leak and a Small Problem
One of the biggest misconceptions about air leakage is that a tiny crack cannot matter.
The issue is cumulative.
A single small opening may not seem significant.
But a home may contain hundreds of them.
Together they can create the equivalent of a much larger opening.
That is why energy auditors evaluate the entire building rather than focusing only on one visible crack.
⸻
How Air Leakage Increases Energy Bills
Imagine heating indoor air during winter.
That air is warmed by the HVAC system.
If it escapes through the attic, new outdoor air enters somewhere else.
The heating system now has to heat the replacement air.
If the leakage continues, the cycle repeats.
During summer, the reverse can happen.
Hot and humid outdoor air enters.
The air-conditioning system must cool and often dehumidify it.
The homeowner effectively pays to condition air that does not stay where intended.
⸻
Air Leakage and Comfort
Air leakage often creates comfort complaints before the homeowner notices the energy impact.
Common symptoms include:
* Drafts
* Cold floors
* Hot rooms
* Cold rooms
* Temperature differences between floors
* Uneven HVAC performance
A homeowner may blame the HVAC system.
But the underlying cause may be envelope leakage.
A strong auditor investigates both.
⸻
Air Leakage and Moisture
Air can carry water vapor.
That makes leakage a moisture-transport mechanism.
If warm, humid air moves into a colder building cavity, it may encounter surfaces below its dew point.
Condensation can then occur.
That can contribute to:
* Wet insulation
* Mold
* Wood decay
* Corrosion
* Odors
* Material damage
This is why air sealing is not just about saving energy.
It can also be part of moisture management.
⸻
Air Leakage and Indoor Air Quality
Uncontrolled leakage can bring air into the home from undesirable locations.
Potential sources include:
* Crawlspaces
* Garages
* Attics
* Dusty cavities
* Mechanical rooms
* Outdoors near pollutant sources
A building that depends heavily on random leakage for air exchange has little control over where that air originates.
Controlled ventilation is much more predictable.
⸻
How Energy Auditors Measure Air Leakage
Visual inspection alone cannot quantify whole-building leakage.
This is where blower door testing becomes extremely important.
A blower door uses a calibrated fan installed in an exterior doorway to create a pressure difference between indoors and outdoors.
A digital manometer measures the pressure.
The fan measures airflow.
A common test condition is:
50 Pascals
The airflow required to maintain that pressure is commonly reported as:
CFM50
or:
Cubic Feet per Minute at 50 Pascals
⸻
What Is CFM50?
CFM50 tells the auditor how much airflow is required to maintain the standardized 50-Pascal pressure difference.
A higher CFM50 generally indicates more building leakage, but the number must be interpreted relative to the size of the building.
A large home will naturally require more airflow than a very small home if they have similar normalized leakage.
That is why auditors often convert CFM50 into another metric:
ACH50
⸻
What Is ACH50?
ACH50 means:
Air Changes per Hour at 50 Pascals
It relates blower door airflow to building volume.
The common formula is:
ACH50 = (CFM50 × 60) ÷ Conditioned Building Volume
Suppose:
* CFM50 = 1,200
* Conditioned volume = 16,000 cubic feet
Then:
ACH50 = (1,200 × 60) ÷ 16,000
ACH50 = 4.5
That gives the auditor a standardized measure of airtightness.
ACH50 is a test condition.
It does not mean the home naturally changes its entire air volume 4.5 times per hour under normal operation.
⸻
Why 50 Pascals?
A 50-Pascal test condition is widely used because it creates a strong enough pressure difference to make building leakage measurable and repeatable.
Under blower door conditions, leakage pathways that are difficult to detect naturally become much easier to investigate.
The test does not simply provide a number.
It creates a diagnostic opportunity.
⸻
Finding the Leaks During a Blower Door Test
Once the building is depressurized, the auditor can systematically investigate leakage pathways.
Useful tools include:
* Smoke pencils
* Smoke puffers
* Infrared cameras
* Pressure measurements
* Physical observation
The auditor can inspect:
* Attic accesses
* Exterior walls
* Windows
* Doors
* Baseboards
* Plumbing penetrations
* Electrical penetrations
* Mechanical chases
* Fireplaces
* Duct penetrations
This turns blower door testing from a compliance exercise into a powerful investigative procedure.
⸻
Thermal Imaging and Air Leakage
Thermal imaging becomes especially useful when combined with blower door testing.
Why?
Because the pressure difference can pull outdoor air through leakage pathways.
If the incoming air has a different temperature from interior surfaces, thermal patterns may become more visible.
This can help auditors identify areas that deserve additional investigation.
But thermal imaging still requires interpretation.
A cold area could also result from:
* Missing insulation
* Thermal bridging
* Moisture
* Shading
* Material differences
The strongest diagnosis comes from combining evidence.
⸻
The Professional Diagnostic Approach
Suppose an auditor finds a cold wall area.
A weak approach is:
“Cold wall = missing insulation.”
A stronger approach is:
Thermal image identifies anomaly
↓
Blower door changes the pattern
↓
Smoke shows air movement
↓
Construction details reveal likely pathway
Now the conclusion is much stronger.
This is the difference between using a tool and performing building diagnostics.
⸻
Air Leakage and HVAC Performance
Air leakage directly affects heating and cooling loads.
A leaky building often requires the HVAC system to compensate for additional outdoor air entering the structure.
That can contribute to:
* Longer equipment runtime
* Higher energy use
* Greater load requirements
* Comfort complaints
This is one reason energy auditors and HVAC professionals should work together.
The HVAC system cannot be fully understood without understanding the building envelope.
⸻
Air Leakage and HVAC Sizing
Suppose a home currently has substantial uncontrolled leakage.
The calculated heating and cooling load may reflect that condition.
Now suppose the home undergoes major air sealing and insulation improvements.
The load may decrease.
That means the correct HVAC capacity after improvements may be different from the capacity required before improvements.
This is why building-envelope work should often be considered before finalizing major HVAC replacement decisions.
⸻
Air Leakage and Duct Systems
Duct leakage and building-envelope leakage are different—but they can interact.
A supply duct leaking outside conditioned space may depressurize the building.
A return leak may pull air from an attic, crawlspace, garage, or other location.
Those pressure changes can influence airflow through the building envelope.
This is why advanced energy auditing considers the building and HVAC distribution system together.
⸻
Air Sealing: Fixing the Problem
Once leakage pathways are identified, appropriate air-sealing measures can be developed.
Materials may include:
* Sealants
* Gaskets
* Appropriate foams
* Sheet materials
* Weatherstripping
* Other approved air-control materials
The correct material depends on:
* Opening size
* Location
* Temperature
* Fire requirements
* Assembly type
* Durability needs
Air sealing should be intentional and durable.
⸻
Common Air-Sealing Priorities
Depending on the building, priority locations may include:
Attic Bypasses
Often important because upper-level leakage can contribute strongly to stack-driven airflow.
Rim Joists
A common lower-level leakage location.
Mechanical Chases
Can create large connections between conditioned and unconditioned areas.
Plumbing and Wiring Penetrations
Numerous small openings can add up.
Attic Hatches
Easy to overlook but often easy to improve.
Exterior Doors
Weatherstripping and thresholds can reduce leakage and improve comfort.
The exact priority should be based on measured and observed conditions.
⸻
Health and Safety Come First
Air sealing should never be approached as:
Tighter is always better.
Before and after major air-sealing work, professionals may need to consider:
* Mechanical ventilation
* Combustion appliances
* Exhaust systems
* Moisture
* Indoor air quality
* Applicable codes and program requirements
In some buildings, reducing uncontrolled leakage without considering these systems can create unintended consequences.
Professional judgment matters.
⸻
The Importance of Mechanical Ventilation
As a home becomes tighter, intentional ventilation may become more important.
Common ventilation strategies include:
* Exhaust-only systems
* Supply-only systems
* Balanced ventilation
* Heat Recovery Ventilators
* Energy Recovery Ventilators
The appropriate solution depends on the climate, building, occupancy, and applicable standards.
The principle is simple:
Control the air instead of letting the cracks control it.
⸻
Air Leakage in New Construction
Air leakage is not just an existing-home problem.
Modern energy codes increasingly place greater emphasis on building-envelope airtightness.
That means builders, HVAC contractors, energy auditors, and testing professionals may be involved in:
* Blower door testing
* ACH calculations
* Code-compliance verification
* Air-sealing troubleshooting
* Retesting
* Documentation
A building that fails its required leakage threshold may need additional air-sealing work before final compliance can be demonstrated.
This creates an important professional role for trained energy auditors.
⸻
Air Leakage and Certificate-of-Occupancy Workflows
In jurisdictions where blower door testing is required as part of the adopted energy code, documentation may be requested as part of final inspection or Certificate of Occupancy workflows.
The testing professional may need to provide:
* Property information
* Building volume
* CFM50
* ACH50
* Test pressure
* Test date
* Technician information
* Compliance result
* Signature or certification information
Requirements vary by jurisdiction, so local code requirements should always be verified.
But standardized reporting can greatly simplify the process.
⸻
Air Leakage and Weatherization
Air sealing is also one of the core components of weatherization.
A professional weatherization workflow may include:
Initial blower door test
↓
Leakage investigation
↓
Air-sealing scope
↓
Installation
↓
Post-work blower door test
The final test can demonstrate how much airtightness changed.
That creates measurable quality control.
⸻
The Value of Before-and-After Testing
Imagine a home begins at:
9.0 ACH50
After targeted air sealing:
5.4 ACH50
The contractor can now show the homeowner a measurable improvement.
Instead of saying:
“We sealed a lot of leaks.”
the professional can say:
“The building’s measured air leakage was reduced substantially under standardized blower door conditions.”
That is a much stronger result.
⸻
Why Documentation Matters
Modern energy auditing is increasingly data-driven.
A professional leakage investigation should document:
* Test results
* Building volume
* Leakage locations
* Photos
* Thermal images where useful
* Recommendations
* Final verification
Good documentation supports:
* Customer confidence
* Quality control
* Contractor communication
* Program compliance
* Future building analysis
It also creates a record of the building’s performance over time.
⸻
Explaining Air Leakage to Homeowners
The technical terms can be intimidating.
A homeowner may not care about pressure boundaries or Pascals.
They care about:
* Comfort
* Energy bills
* Moisture
* Drafts
A useful explanation might be:
Your HVAC system heats and cools the air inside your home. Air leakage allows some of that conditioned air to escape while outdoor air enters through uncontrolled openings. The more unnecessary leakage the home has, the harder the HVAC system may need to work to maintain comfort.
That explanation is simple, accurate, and useful.
⸻
Air Leakage Is Often About More Than One Problem
A good energy auditor avoids oversimplification.
High air leakage may be associated with:
* Attic bypasses
* Poor air-barrier continuity
* Foundation leakage
* Window and door gaps
* Mechanical chases
* Duct penetrations
The best solution may involve several targeted measures.
This is why whole-building diagnostics are valuable.
⸻
BPMS™ and Air Leakage Analysis
Building Performance Modeling Systems (BPMS™) is designed to help energy professionals bring air-leakage diagnostics into a connected building-performance workflow.
Instead of storing:
* Blower door readings in one place
* Photos somewhere else
* Thermal images in another application
* Reports in a separate folder
BPMS™ can bring project information together.
This creates a stronger connection between:
Measurement → Finding → Recommendation → Report
⸻
BPMS™ ACH Calculator
BPMS™ includes an ACH workflow that allows professionals to record blower door data and calculate Air Changes per Hour.
Key information can include:
* Building volume
* CFM50
* Test pressure
* Property information
* Technician information
The platform can then produce the ACH50 result and incorporate it into project documentation.
This reduces reliance on manual spreadsheets and disconnected calculations.
⸻
BPMSField™ and Air Leakage Documentation
BPMSField™ extends the workflow into the field.
Auditors can use the mobile environment to capture project documentation while performing the inspection.
That can include:
* Photos
* Notes
* Leakage observations
* Diagnostic documentation
* Location-related information
The goal is to keep field evidence connected to the correct audit from the moment it is collected.
⸻
BPMS Thermal™ and Leakage Investigation
BPMS Thermal™ brings infrared imagery into the BPMS™ building-performance record.
During blower door testing, thermal patterns can help identify areas that deserve closer inspection.
Keeping those images associated with the relevant:
* Room
* Building assembly
* Finding
* Recommendation
makes the final report more useful.
⸻
BPMS LiDARScan™ and Building Volume
Accurate conditioned volume is essential when calculating ACH50.
Traditional methods may involve measuring:
* Floor area
* Ceiling heights
* Building geometry
BPMS LiDARScan™ is designed to capture building geometry digitally on compatible devices.
That information can help improve the accuracy of spatial data used throughout the audit workflow.
Accurate volume matters because an error in building volume directly affects the calculated ACH50.
⸻
BPMS Load CalC™ and Infiltration
Air leakage contributes to heating and cooling loads.
BPMS Load CalC™ is designed to connect building characteristics and infiltration-related information with load-analysis workflows.
That helps professionals understand the relationship between:
Building airtightness
and
HVAC requirements
rather than treating them as unrelated calculations.
⸻
BPMS Intelligence™ and Air Leakage
BPMS Intelligence™ adds another analytical layer.
Imagine an audit containing:
* High ACH50
* Homeowner draft complaints
* Thermal anomalies near the attic
* Low insulation levels
* High winter energy use
Each item alone provides information.
Together they create a stronger story.
BPMS Intelligence™ is designed to help surface those relationships for professional review.
The auditor remains responsible for the diagnosis.
The intelligence layer helps organize the evidence.
⸻
BPMS FluxSense Analyzer™ and Thermal Performance
The developing BPMS FluxSense Analyzer™ introduces direct heat-flow measurement into the broader BPMS™ ecosystem.
Air leakage and heat flow are not identical phenomena, but they both influence the thermal performance of a building.
Combining:
* Air leakage data
* Thermal imaging
* Heat-flux information
* Indoor/outdoor temperatures
* Building geometry
may eventually provide professionals with a more complete view of envelope performance.
⸻
The Future of Air-Leakage Diagnostics
Air leakage testing is likely to become increasingly integrated with other building technologies.
Future workflows may combine:
Blower Door Data
Thermal Imaging
LiDAR Geometry
Heat-Flux Measurement
Weather Data
AI-Assisted Analysis
Instead of looking at air leakage as a single number, professionals may increasingly evaluate it as part of a complete digital building-performance model.
That is where the industry is heading.
⸻
The Professional Advantage of Understanding Air Leakage
An energy auditor who truly understands air leakage can provide more value than someone who only operates a blower door.
The professional should understand:
* Why air moves
* What creates pressure
* How leakage affects energy
* How leakage affects moisture
* How leakage interacts with HVAC
* How to locate pathways
* How to prioritize sealing work
* When ventilation must be considered
* How to verify results
That knowledge turns a blower door test into building science.
⸻
Air Leakage Changes the Way You See a Building
Before understanding air leakage, a house looks solid.
After understanding air leakage, you begin to see invisible connections.
You see:
* The attic hatch as part of the pressure boundary.
* The plumbing chase as a possible vertical air pathway.
* The rim joist as an important lower leakage zone.
* The range hood as a pressure driver.
* The duct system as part of the pressure relationship.
* The insulation as separate from the air barrier.
* The homeowner’s cold-room complaint as diagnostic evidence.
That is what building science does.
It changes the way professionals see buildings.
⸻
Five Questions Every Auditor Should Ask About Air Leakage
When investigating a building, ask:
1. Where is the pressure boundary?
Know what separates conditioned space from unconditioned space.
2. What forces are moving the air?
Wind, stack effect, mechanical equipment—or a combination?
3. Where are the pathways?
Find the cracks, gaps, penetrations, and connections.
4. What is the consequence?
Energy loss? Comfort? Moisture? Air quality? HVAC load?
5. Can the improvement be measured?
Use before-and-after testing where appropriate.
These five questions can turn a vague draft complaint into a systematic building-performance investigation.
⸻
Air Leakage: Measure It. Find It. Fix It. Verify It.
A professional air-leakage workflow can be summarized simply:
Measure
Quantify building leakage using appropriate testing.
Find
Use diagnostics to locate important pathways.
Fix
Develop targeted air-sealing measures.
Verify
Retest where appropriate to confirm improvement.
This creates accountable building performance.
⸻
Final Thoughts
Air leakage is invisible, but its effects are not.
It can appear as:
High energy bills.
Drafts.
Cold floors.
Hot rooms.
Moisture problems.
Uneven HVAC performance.
Excessive equipment runtime.
The challenge for the energy auditor is connecting those symptoms to the physical behavior of the building.
Blower door testing turns leakage into a number.
Thermal imaging helps visualize its effects.
Smoke testing helps identify pathways.
Building science explains why the air is moving.
And professional analysis turns those findings into solutions.
Modern platforms such as BPMS™, together with BPMSField™, BPMS Thermal™, BPMS LiDARScan™, BPMS Load CalC™, BPMS Intelligence™, and the developing BPMS FluxSense Analyzer™, are designed to help professionals bring those different sources of evidence together.
Because the goal is not simply to find cracks.
It is to understand the building.
And once air leakage can be measured, located, explained, and verified, professionals can turn one of the most invisible building problems into one of the most actionable opportunities for better performance.
Control the air. Control the energy. Improve the building.
BPMS™ — One Platform. Complete Building Performance.
Comments and Reviews
Share what you found helpful and how this article supported your work.
0.0/5from 0 reviews
No reviews yet. Be the first to share your feedback.